Print Version Email Page Add to Favorites Comments Alert Me Add to My Links

Wednesday, October 22, 2008

SharePoint 2007: Image Slide Show Web Part

Introduction
Most of the times, there is a demand for a web part, which will show the images stored in Images Library created in SharePoint site in a Slide show manner.

Code Download

How to use this Web Part?

This solution is customized to show images from Images Library as well from image URL.
After adding this web part to your site, edit the Custom Properties of web part by clicking edit -> Modify Shared Web Part.
  1. To display images from Image Library named Photos and a Google image, type the below text in Image URLs custom property of web part: Photos;http://www.google.com/intl/en_ALL/images/logo.gif
  2. Choose the Image Transition from the drop down.
  3. Type in the Transition Delay in seconds.
Enjoy the Slide Show!

Tuesday, September 30, 2008

Enable Drop Down menu in Top Navigation Bar of Non-Publishing SharePoint Sites

Introduction
The drop down menu in top Navigation Bar of SharePoint site, this feature is available out of the box in Publishing sites. But, sometimes we need to have the same on Non-Publishing site, for e.g.: Blank Site, Team Site, etc. To achieve this, we need to carry out the below steps.

Activate Navigation Feature
1. Execute the below command:
stsadm -o activatefeature -filename navigation\feature.xml –url -force
2. Reset IIS.

Modify Master Page
1. Open the SharePoint Site in SharePoint Designer 2007.
2. Navigate through the folder and open the default.master page.
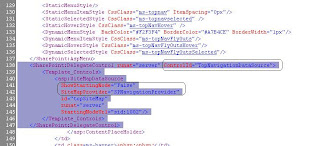
3. Find the below code snippet:


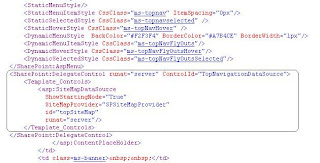
4. Modify the code as below:


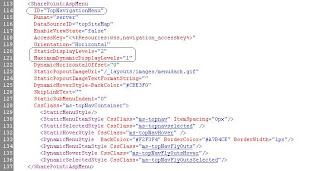
5. Find the below code snippet:


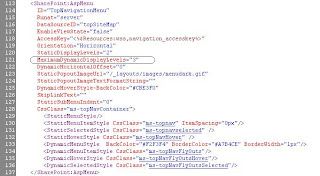
6. Modify the code as below:

7. Save the changes.

The Navigation will start appearing in the Site Settings page.
Click Navigation, adjust your navigation menu by adding Headings, Links and arrange them.
The drop down menu will start appearing on your SharePoint site now.

Thursday, August 28, 2008

Adding Flash Animation to SharePoint 2007 Site

Adding a flash animation (.swf) file is merely easy task.
  • Upload flash file (.swf) to Document Library. (For e.g.: wolf.swf is the file, I have uploaded to my Document Library)
  • Add a Content Editor Web Part to your page.
  • Click Source Editor.
  • Paste the following code there:


< OBJECT classid="clsid:D27CDB6E-AE6D-11cf-96B8-444553540000
codebase="http://download.macromedia.com/pub/shockwave/cabs/flash/swflash.cab#version=7,0,0,0"
WIDTH="550"
HEIGHT="400">

< PARAM NAME=movie VALUE="/Shared%20Documents/wolf.swf">
< PARAM NAME=WMODE VALUE="Transparent">
< PARAM NAME=quality VALUE="high">

< EMBED src="/Shared%20Documents/wolf.swf"
quality="high"
wmode="transparent"
WIDTH="550"
HEIGHT="400"
TYPE="application/x-shockwave-flash"
PLUGINSPAGE="http://www.macromedia.com/shockwave/download/index.cgi?P1_Prod_Version=ShockwaveFlash">
< /EMBED>
< /OBJECT>

Friday, August 22, 2008

MOSS 2007 : Feature Stapling

Introduction
Recently, I came across a situation, where-in I need to apply our custom theme to sharepoint site upon creation, i.e. setting our custom theme as a default one.
We generally have to go for customizing the out of box templates. In such a case, modifying the 12 hive folder is one option, but isn’t recommended as it will render the site unsupported in case of an upgrade.

In this post, I will be demonstrating how to attach a custom feature with a site template. Feature Stapling allows to staple a Feature to a site definition without modifying it in any way. To use feature-stapling, you first need the feature(s) you wish to link to the site definition - these should be created in the normal way. Then you should create a 2nd feature which does the actual stapling.

Step 1 - Create a Sample Feature
Create a sample feature, which will be activated every time a site is created with a specified template.
  • Create a Class Library project and inherit SPFeatureReceiver class
  • Override FeatureActivated() method.
  • Strongly name the assembly.
  • Add assembly to GAC.


  • Create a folder called ACMEThemeFeature inside FEATURES folder. (%ProgramFiles%\Common Files\Microsoft Shared\web server extensions\12\TEMPLATE\FEATURES)
  • Create a feature.xml file inside ACMEThemeFeature folder.


  • Run the following command to install this feature:
C:\Program Files\Common Files\Microsoft Shared\web server extensions\12\BIN>stsadm -o installfeature -name ACMEThemeFeature

Step 2 - Associate a Template with Feature
After creating and installing a feature, we need to associate a template with this feature, for that purpose we will again create a feature but with scope as FARM (This is called a stapler feature).
  • Create a folder called ACMEThemeStapler inside FEATURES folder.
  • Create Feature.xml file inside ACMEThemeStapler folder.


  • Create Element.xml inside ACMEThemeStapler folder.


  • FeatureSiteTemplateAssociation ID inside Element.xml is id of the ACMEThemeFeature feature.
  • TemplateName is the teamplet name, you will get a list of TemplateName from Roadburn’s SharePoint 2007 blog.
  • Install ACMEThemeStapler feature using below command from command prompt:
C:\Program Files\Common Files\Microsoft Shared\web server extensions\12\BIN>stsadm -o installfeature -name ACMEThemeStapler

Now, whenever a new site is created, ACMEThemeFeature feature will be activated and the will apply the specified theme to site.

Tuesday, July 01, 2008

Read More link on SharePoint Blog Posts

Introduction
People generally does not like to read the long posts. SharePoint 2007 - Blog does not provide with any feature to restrict the number of characters / lines to be displayed on the Blog Posts. The Blog Authors (like me) likes to write the long posts. With few such a blog posts on SharePoint - Blog site, makes the Home Page scrollable. As a result, the blog posts at the end of the page gets ignored by the readers.

Solution
The solution to this, I thought of is to use XSLT.

  1. Open your sharepoint site in SharePoint Designer 2007.
  2. Open default.aspx in Design View.
  3. Click Insert -> SharePoint Controls -> Data View.
  4. Select Posts from available data sources.
  5. Switch to Code Window.
  6. Modify the code as below:

Tuesday, June 17, 2008

CAPTCHA for SharePoint Blog

Introduction
The word ‘CAPTCHA’ stands for Completely Automated Public Turing test to tell Computers and Humans Apart. Most World Wide Web users will have seen this kind of test in the form of a picture of a word (usually distorted), which the user must type into an input box to prove that they are a real person, and not just a spambot, or some other computerized agent trawling the Web for exploits.

A CAPTCHA is a challenge-response test most often placed within web forms to determine whether the user is human. The purpose of CAPTCHA is to block form submissions from spambots – automated scripts that harvest email address from publicly available web forms.

Implementing CAPTCHA For SharePoint

Create HTTPHandler for Generating Image
The easiest way to create a custom HttpHandler component is to create a source file with an .ashx extension. You must then add a @WebHandler directive to the top of the .ashx file, along with a class definition that implements the IHttpHandler interface. Any class that implements the IHttpHandler interface must provide an implementation of the IsReusable method and the ProcessRequest method. If you want to be able to program against the Windows SharePoint Services object model from inside the HttpHandler component, you can also add an @Assembly directive to reference the Microsoft.SharePoint assembly.
1. Create a folder inside LAYOUTS directory. For e.g.: C:\Program Files\Common Files\Microsoft Shared\web server extensions\12\TEMPLATE\LAYOUTS\Sprint
2. Create a file named captcha.ashx inside that folder.
3. Include the following code in captcha.ashx


<%@ Assembly Name="Microsoft.SharePoint, Version=12.0.0.0, Culture=neutral, PublicKeyToken=71e9bce111e9429c" %>
<%@ WebHandler Language="C#" Class="captcha" %>

using System;
using System.Web;
using System.Drawing;
using System.Web.SessionState;
using System.Data;
using System.Configuration;
using System.Web.Security;
using System.Web.UI;
using System.Web.UI.WebControls;
using System.Web.UI.WebControls.WebParts;
using System.Web.UI.HtmlControls;
using System.Drawing.Drawing2D;

public class captcha : IHttpHandler, IRequiresSessionState
{

public void ProcessRequest (HttpContext context) {
context.Response.ContentType = "image/jpeg";
ADSSAntiBot captcha = new ADSSAntiBot();
string str = captcha.DrawNumbers(5);
if (context.Session[ ADSSAntiBot.SESSION_CAPTCHA] == null) context.Session.Add(ADSSAntiBot.SESSION_CAPTCHA, str);
else
{
context.Session[ ADSSAntiBot.SESSION_CAPTCHA] = str;
}
Bitmap bmp = captcha.Result;
bmp.Save(context.Response.OutputStream, System.Drawing.Imaging.ImageFormat.Jpeg);
}


public bool IsReusable {
get {
return true;
}
}

}

public class ADSSAntiBot
{
public static string SESSION_CAPTCHA = "CAPTCHA";


const int default_width = 135;
const int default_height = 35;

protected Bitmap result = null;

public int Width;
public int Height;

public ADSSAntiBot()
{
InitBitmap(default_width, default_height);
rnd = new Random();
}

public ADSSAntiBot(int width, int height)
{
InitBitmap(width, height);
}

protected void InitBitmap(int width, int height)
{
result = new Bitmap(width, height);
Width = width;
Height = height;
rnd = new Random();
}


public PointF Noise(PointF p, double eps)
{
p.X = Convert.ToSingle(rnd.NextDouble() * eps * 2 - eps) + p.X;
p.Y = Convert.ToSingle(rnd.NextDouble() * eps * 2 - eps) + p.Y;
return p;
}

public PointF Wave(PointF p, double amp, double size)
{
p.Y = Convert.ToSingle(Math.Sin(p.X / size) * amp) + p.Y;
p.X = Convert.ToSingle(Math.Sin(p.X / size) * amp) + p.X;
return p;
}


public GraphicsPath RandomWarp(GraphicsPath path)
{
// Add line //
int PsCount = 10;
PointF[] curvePs = new PointF[PsCount * 2];
for (int u = 0; u < PsCount; u++)
{
curvePs[u].X = u * (Width / PsCount);
curvePs[u].Y = Height / 2;
}
for (int u = PsCount; u < (PsCount * 2); u++)
{
curvePs[u].X = (u - PsCount) * (Width / PsCount);
curvePs[u].Y = Height / 2 + 2;
}

path.AddLines(curvePs);

//
double eps = Height * 0.05;

double amp = rnd.NextDouble() * (double)(Height / 3);
double size = rnd.NextDouble() * (double)(Width / 4) + Width / 8;

double offset = (double)(Height / 3);


PointF[] pn = new PointF[path.PointCount];
byte[] pt = new byte[path.PointCount];

GraphicsPath np2 = new GraphicsPath();

GraphicsPathIterator iter = new GraphicsPathIterator(path);
for (int i = 0; i < iter.SubpathCount; i++)
{
GraphicsPath sp = new GraphicsPath();
bool closed;
iter.NextSubpath(sp, out closed);

Matrix m = new Matrix();
m.RotateAt(Convert.ToSingle(rnd.NextDouble() * 30 - 15), sp.PathPoints[0]);

//m.Shear(Convert.ToSingle( rnd.NextDouble()*offset-offset ),Convert.ToSingle( rnd.NextDouble()*offset-offset/2 ));
//m.Shear(1,1);

//m.Scale(0.5f + Convert.ToSingle(rnd.NextDouble()), 0.5f + Convert.ToSingle(rnd.NextDouble()), MatrixOrder.Prepend);

m.Translate(-1 * i, 0);

sp.Transform(m);

np2.AddPath(sp, true);
}


for (int i = 0; i < np2.PointCount; i++)
{
//pn[i] = Noise( path.PathPoints[i] , eps);
pn[i] = Wave(np2.PathPoints[i], amp, size);
pt[i] = np2.PathTypes[i];
}

GraphicsPath newpath = new GraphicsPath(pn, pt);

return newpath;

}

Random rnd;


public string DrawNumbers(int len)
{
string str = "";
for (int i = 0; i < len; i++)
{
int n = rnd.Next() % 10;
str += n.ToString();
}
DrawText(str);
return str;
}

public void DrawText(string aText)
{

Graphics g = Graphics.FromImage(result);
int startsize = Height;
Font f = new Font("Verdana", startsize, FontStyle.Bold, GraphicsUnit.Pixel);

do
{
f = new Font("Verdana", startsize, GraphicsUnit.Pixel);
startsize--;
} while ((g.MeasureString(aText, f).Width >= Width) || (g.MeasureString(aText, f).Height >= Height));
SizeF sf = g.MeasureString(aText, f);
int width = Convert.ToInt32(sf.Width);
int height = Convert.ToInt32(sf.Height);

int x = Convert.ToInt32(Math.Abs((double)width - (double)Width) * rnd.NextDouble());
int y = Convert.ToInt32(Math.Abs((double)height - (double)Height) * rnd.NextDouble());

//////// Paths ///
GraphicsPath path = new GraphicsPath(FillMode.Alternate);

FontFamily family = new FontFamily("Verdana");
int fontStyle = (int)(FontStyle.Regular);
float emSize = f.Size;
Point origin = new Point(x, y);
StringFormat format = StringFormat.GenericDefault;

path.AddString(aText, family, fontStyle, emSize, origin, format);

path = RandomWarp(path);
/// Path ///

g.TextRenderingHint = System.Drawing.Text.TextRenderingHint.AntiAliasGridFit;
Rectangle rect = new Rectangle(0, 0, Width, Height);
g.FillRectangle(new System.Drawing.Drawing2D.LinearGradientBrush(rect, Color.White, Color.LightGray, 0f), rect);
//g.DrawString(aText, f, new SolidBrush(Color.Black), x, y);
g.SmoothingMode = SmoothingMode.AntiAlias;
g.FillPath(new SolidBrush(Color.Black), path);


// Dispose //
g.Dispose();
}

public Bitmap Result
{
get
{
return result;
}
}
}


Now, this HTTPHandler is accessible to any site in the farm by using a site-relative path. http://MyWebServer/_layouts/ACME/captcha.ashx
Note:Please make sure that you have unblocked .ashx extension for your web application from Central Administration.
Unblock .ashx extension for your web application from Central Administration
1. Open SharePoint 3.0 Central Administration.
2. Click Operations tab.
3. Click Blocked file types under Security Configuration.
4. Select your web application.
5. Remove ashx file extension from the list.
6. Click OK.
Implement SharePoint WebPart for CAPTCHA
1. Create a Class Library Project using Visual Studio 2005.
2. Add a reference to:
a. System.Web
b. Microsoft.SharePoint


using System;

using System.Web;

using System.Web.UI;

using System.Web.UI.WebControls;

using Microsoft.SharePoint;

using Microsoft.SharePoint.WebPartPages;


namespace CaptchaWebPart

{

public class CaptchaWebPart : WebPart

{

private Image imgCaptcha;

private TextBox txtCaptchaNumber;

private RequiredFieldValidator rfv;

private CustomValidator captchaValidator; // Performs user-defined validation on an input control.


///

/// Override the ASP.NET Web.UI.Controls.CreateChildControls method

/// to create the objects for the Web Part's controls.

///


protected override void CreateChildControls()

{

// Get the SPWeb

//SPSite siteColl = SPContext.Current.Site;

SPWeb site = SPContext.Current.Web;


// table Formatting

Controls.Add(new LiteralControl("<_table border="\">"));

Controls.Add(new LiteralControl("<_tr><_td>"));


// CAPTCHA Image

imgCaptcha = new Image();

imgCaptcha.ID = "imgCaptcha";

imgCaptcha.ImageUrl = site.Url + "/_layouts/Sprint/captcha.ashx";

imgCaptcha.AlternateText = "If you can't read this number refresh your screen.";

Controls.Add(imgCaptcha);


Controls.Add(new LiteralControl(""));

Controls.Add(new LiteralControl("<_tr><_td>"));

Controls.Add(new LiteralControl("<_strong>Enter the code shown above: <_span style="\">*<_br>"));


// Textbox for user to enter CAPTCHA Text

txtCaptchaNumber = new TextBox();

txtCaptchaNumber.ID = "txtCaptchaNumber";

txtCaptchaNumber.EnableViewState = false;

Controls.Add(txtCaptchaNumber);


// Required Field Validator

rfv = new RequiredFieldValidator();

rfv.ControlToValidate = "txtCaptchaNumber";

rfv.Display = ValidatorDisplay.Dynamic;

rfv.Text = "*";

Controls.Add(rfv);


captchaValidator = new CustomValidator();

captchaValidator.ServerValidate += new ServerValidateEventHandler(captchaValidator_ServerValidate);

captchaValidator.Display = ValidatorDisplay.Dynamic;

captchaValidator.Text = "Incorrect Code";

Controls.Add(captchaValidator);


Controls.Add(new LiteralControl("<_br><_i>(Note: If you cannot read the numbers in the above image, reload the page to generate a new one.)"));

Controls.Add(new LiteralControl(""));

Controls.Add(new LiteralControl(""));

}


///

/// Renders the HTML for the body of a Web Part to the client.

///


///

protected override void RenderWebPart(HtmlTextWriter output)

{

RenderChildren(output);

}


///

/// Raises the ServerValidate event for the CustomValidator control.

///


///

///

void captchaValidator_ServerValidate(object source, ServerValidateEventArgs args)

{

if (txtCaptchaNumber.Text == (string)this.Page.Session["CAPTCHA"])

{

args.IsValid = true;

}

else

{

args.IsValid = false;

}

}


}

}


Note: Please remove _ from above code appearing before HTML Tags (for e.g.: _table, _td, _tr)

3. Sign the assembly with Strong Key Name file.
4. Compile the code.

Configuring Portal to use Captcha WebPart
1. Navigate to Blog’s site.
2. Click on Comments link under any blog post. (http://provpc:24106/ACME/Lists/Posts/Post.aspx?ID=1#Comments&PageView=Shared)
3. Click Site Actions -> Edit Page.
4. Click Add a Web Part.
5. Select CaptchaWebPart from category Miscellaneous under All Web Parts.
6. Click edit -> Modify Shared Web Part.
7. Select Chrome Type as None.
8. Click OK.
9. Align CaptchaWebPart below New Comment WebPart.
10.Click Exit Edit Mode.

The CAPTCHA WebPart will appear as below:


Code Download:

Wednesday, June 11, 2008

Exposing SharePoint Workflow As Web Service

1. Create a New Project in Visual Studio 2005, by selecting the template: Sequential Workflow Library.

2. Add an Interface to your project (e.g. Interface1.cs)

3. Add a Method to above Interface.

The code will look like as below:

namespace WorkflowAsWebService

{

interface Interface1

{

string HelloWorld(string strName);

}

}

4. Drag and drop WebServiceInput activity.

Set the following properties

Property

Value

IsActivating

True

InterfaceType

WorkflowAsWebService.Interface1

MethodName

HelloWorld

Bind the parameter strName to a new member. For e.g.: webServiceInputActivity1_strName1

5. Drag and drop WebServiceOutput activity.

Set the following properties

Property

Value

InputActivityName

webServiceInputActivity1

Bind the parameter ReturnValue to a new member. For e.g.: webServiceOutputActivity1__ReturnValue_1

6. Write a code to handle the event webServiceInputActivity1_InputReceived

The code will look like as below:

private void webServiceInputActivity1_InputReceived(object sender, EventArgs e)

{

webServiceOutputActivity1__ReturnValue_1 = "Hello " + webServiceInputActivity1_strName1;

}

7. Right Click on the Project Name in Solution Explorer and select the option Publish as Web Service.

Tuesday, June 10, 2008

SharePoint Wiki: Create pages based on a template

Creating Wiki-Pages from a Template

To make Wiki pages look uniform, it would be handy if there was always the same template used when the pages are created. Unfortunately, WSS 3.0/MOSS 2007 doesn't support this functionality (yet).

The configuration part

  1. Create a WIKI site.
  2. Create a Custom List called something like "Page Templates".
  3. Add a custom column "Template" and make it multi-line rich-text including pictures etc.
  4. Now create your HTML Template.
  5. Copy your HTML (only the part inside the <body> of course) and add an entry in your custom list. In my example, the title is "Wikipedia" and in the "Template Column" switch to HTML view and paste your HTML Template.
  6. If your template needs a separate stylesheet, you must proceed like with any other stylesheet in MOSS (and make sure it doesn't interfere with the standard styles so your layout gets corrupted.):
    1. Upload the style sheet to the appropriate location in the Styles Library.
    2. Add a link to the style-sheet to the master page (Example: <SharePoint:CssRegistration name="<% $SPUrl:~sitecollection/Style Library/wikipedia_common.css %>" runat="server"/>)

The development part

This is a quick'n'dirty approach in a development environment and you mustn't change standard MOSS-files! If you want to use this in a real environment, create a custom site definition where the Wiki Pages list doesn't point to _layouts/CreateWebPage.aspx but to your own page which is deployed with your custom site definition.

  1. Create a new class-library.
  2. Make sure it will be signed.
  3. Add two references:
    1. Microsoft.SharePoint.dll (12\ISAPI)
    2. Microsoft.SharePoint.ApplicationPages.dll (\12\CONFIG\BIN)
  4. Create your class inheriting from CreateWebPage as shown in the code example.

using System;

using System.Web.UI;

using System.Web.UI.WebControls;

using Microsoft.SharePoint.ApplicationPages;

using Microsoft.SharePoint.WebControls;

using Microsoft.SharePoint;

namespace CustomTemplateForWikis

{

public class EnhancedCreateWebpage : CreateWebPage

{

protected ListFieldIterator listFieldIterator;

protected string template;

protected Label lblTemplateID;

protected DropDownList ddltemplateList;

public EnhancedCreateWebpage()

{

}

protected override void OnPreRender(EventArgs e)

{

if (!this.Page.IsPostBack)

{

FillTemplateDropDown();

}

// Get the templates list

SPList templatesList = this.listFieldIterator.Web.Lists["Page Templates"];

if (TemplateSourceDirectory != null && templatesList.Items.Count > 0)

{

// Just take the first template for demonstration

//int templateID = int.Parse(Request.QueryString["TemplateID"].ToString());

int templateID = int.Parse(ddltemplateList.SelectedValue) - 1;

this.template = templatesList.Items[templateID]["Template"].ToString();

}

templatesList = null;

this.FindRichTextControl(listFieldIterator);

base.OnPreRender(e);

}

private void FindRichTextControl(Control control)

{

foreach (Control childControl in control.Controls)

{

if (childControl.GetType().Equals(typeof(Microsoft.SharePoint.WebControls.RichTextField)))

{

((RichTextField)childControl).Value = this.template;

return;

}

this.FindRichTextControl(childControl);

}

}

private void FillTemplateDropDown()

{

if (ddltemplateList != null)

{

SPList templatesList = this.listFieldIterator.Web.Lists["Page Templates"];

ddltemplateList.DataSource = templatesList.Items;

ddltemplateList.DataTextField = "Title";

ddltemplateList.DataValueField = "ID";

ddltemplateList.DataBind();

}

}

}

}

  1. Compile and deploy to the GAC.
  2. Make changes in CreateWebPage.aspx
    1. Open the file "12\TEMPLATE\LAYOUTS\CreateWebPage.aspx" (a backup could maybe be handy…)
    2. Change the header to point to your assembly:

    <%@ Assembly Name="Mho.SharePoint.Trials, Version=1.0.0.0, Culture=neutral, PublicKeyToken=261ba54b9846991b"%>

      1. Set the correct class to inherit from

    <%@ Page Language="C#" Inherits="Mho.SharePoint.Trials.EnhancedCreateWebpage"…

      1. Add the name of the "ListFieldIterator" control you've used in the class code as its ID:

    <SharePoint:ListFieldIterator ID="listFieldIterator"…

      1. Add Dropdown:

    <asp:DropDownList ID="ddltemplateList" AutoPostBack="true" runat="server" />

    1. Recycle the application pool and try it out.

    Code Download:

    Installing Custom Site Templates as Top Level Templates in Central Administration

    You can save sites in SharePoint Server 2007 as custom site templates using the browser via the Site Settings –> Look and Feel > Save Site as Template.

    Note:
    If you have the Office SharePoint Server Publishing Feature enabled, then the Save Site as Template link will not appear.

    The Save Site as Template link will save the site template to the site collection Site Template Gallery and the site template will then become available for subsites within the site collection.

    But, if you want to create a top level site template which you can use as the root site when creating new site collections throughout Web applications, you’ll need to use the SharePoint STSADM command line tool to install the custom site template.

    The top level site templates are accessed when creating a new site collection in Central Administration –
    Central Administration > Application Management > Create Site Collection.
    SharePoint will automatically generate a Custom tab in the Template Selection where any custom site templates will be available for selection.

    To install a custom site template using STSADM, where the site template is named exercise and located in the root of Drive C:
    stsadm –o addtemplate –filename c:\exercise.stp –title exercise
    Note:
    An iisreset will be necessary before the template is made available.

    Other template-related commands include:
    1. To enumerate custom site templates on a SharePoint server:
    stsadm –o enumtemplates
    2. To delete a custom site template:
    stsadm –o deletetemplate –title exercise
    Note: An iisreset will be necessary to complete template removal.

    Friday, April 11, 2008

    SharePoint : Make a list view that shows only items dated 'This Week'

    1. Create a datetime column named Date.

    2. Create a calculated column named WeekStart returning type datetime, with the calculation:
    =IF(TEXT(WEEKDAY(Date),"ddd")="Mon",Date,IF(TEXT(WEEKDAY(Date-1),"ddd")="Mon ",Date-1,IF(TEXT(WEEKDAY(Date-2),"ddd")="Mon",Date-2,IF(TEXT(WEEKDAY(Date-3) ,"ddd")="Mon",Date-3,IF(TEXT(WEEKDAY(Date-4),"ddd")="Mon",Date-4,IF(TEXT(WEE KDAY(Date-5),"ddd")="Mon",Date-5,Date-6))))))

    3. Create a calculated column named WeekEnd returning type datetime, with the calculation:
    =IF(TEXT(WEEKDAY(Date),"ddd")="Sun",Date,IF(TEXT(WEEKDAY(Date+1),"ddd")="Sun ",Date+1,IF(TEXT(WEEKDAY(Date+2),"ddd")="Sun",Date+2,IF(TEXT(WEEKDAY(Date+3) ,"ddd")="Sun",Date+3,IF(TEXT(WEEKDAY(Date+4),"ddd")="Sun",Date+4,IF(TEXT(WEE KDAY(Date+5),"ddd")="Sun",Date+5,Date+6))))))

    4. Create a view with the following filter:
    WeekStart <= [Today] AND WeekEnd >= [Today]

    Tuesday, April 08, 2008

    Custom Site Theme for SharePoint 2007 (MOSS 2007) and WSS 3.0

    Recently I shifted to SharePoint 2007, after working with ASP .Net for more than couple of years.

    When it's about developing a web application, the first thing all concentrate is on the UI part of it. Everyone wish to see his/her site with some good UI elements. The SharePoint 2007 gives you more flexibility by introducing the concept of Themes. (Now a days ASP .Net also does support Themes).

    The easiest and the fastest way to apply the same look and feel on any SharePoint site is creating a site theme.

    A SharePoint site theme basically consists of theme.inf, theme.css, and image files.

    • Theme.inf file simply represents the title of the theme.
    • Theme.css is a stylesheet file that defines colors, header images and layouts of a site
    • Image files can be referenced here to display on the page.

      By creating a custom site theme, you can easily change the style but in fact, writing and editing the stylesheet can be somewhat challenging when you have more than a hundred of elements to deal with.

      Here is a short procedure of creating a custom site theme named "Ghost":

      1. Copy any theme folder in "C:\Program Files\Common Files\Microsoft Shared\web server extensions\12\TEMPLATE\THEMES" folder and paste with its name replaced with "Ghost". In this example, copy GRANITE folder.

      2. In Ghost folder, rename GRANITE.INF file to GHOST.INF in upper case.

      3. Open GHOST.INF file with notepad.

      4. Change the value of title under [Info] to Ghost.

      5. Replace every word, Granite, under [titles] with Ghost.

      6. Open "C:\Program Files\Common Files\Microsoft Shared\web server extensions\12\TEMPLATE\LAYOUTS\1033\SPTHEMES.XML" file with notepad.

      7. Add the following lines under tag:

      Ghost
      Ghost
      Ghost theme.
      images/thghost.gif
      images/thghost.gif

      Notice that preview and thumbnail paths are images/thghost.gif. By default, MOSS 2007 and WSS 3.0 will not have such image files.

      8. In order to display thumbnail and preview correctly, you will need to capture the screen and save the file in "C:\Program Files\Common Files\Microsoft Shared\web server extensions\12\TEMPLATE\IMAGES" folder with thghost.gif name. You can change the .gif file name if you change the thumbnail and preview file names in tag.

      9. Do an iisreset for the server to recognize the new theme.

      Pretty simple procedure. Now you are ready to test your new theme. In Site Settings, you can now choose Ghost theme; however, the theme will not differ from Granite theme. Now, it is time for you to play with theme.css file!

    World Clock